Voting
Showing posts with label Gluten Free. Show all posts

Friday, April 17, 2015

Charro Beans


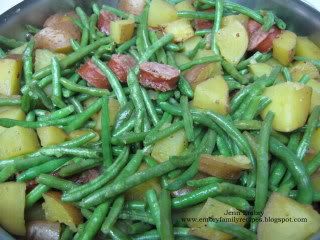
When we lived in Idaho Falls, one of my favorite things to do was to meet up with a friend for lunch at Garcia's, have lunch and knit while we chatted and caught up with each other. Just good old fashioned girl time. Their gluten free menu is a bit sparse, but my favorite thing on it was the Charro Beans. Best. Thing. Ever. My favorite way to eat them was to have them start with a bowl of beans and then top them with shredded chicken, tomatoes, black olives, cheese, and avocado. Not only was it delicious, but it made for a thick & hearty lunch.  Since moving to Wisconsin, we've found a couple of Mexican restaurants that we really like, but I hadn't found any fabulous Charro Beans. So I took to the internet, asked friends on Facebook, search Pinterest and recipe sites. I couldn't find a recipe that seemed quite the combination I was looking for, so I did what any adventurous cook would do, I made up my own!  The results were fabulous and an instant hit with both me and my teen daughter. 

1 lb. dried pinto beans
1 can diced tomatoes or about 2 cups diced fresh tomatoes*
1 onion, diced
3 cloves fresh garlic, finely minced
½ lb. bacon, cut into pieces**
1 jalapeno, seeded and diced
1 ½ quarts chicken broth***

     Rinse beans and soak overnight. 
-       Drain and rinse beans. Fill pot (or crockpot) with beans and water about an   inch over the top of the beans.
-      Cook for a couple of hours over low to medium low heat until beans start to get tender.
-      Drain beans and set aside.
-      In same pan (if using stove top & not crockpot), cook bacon until crisp. Save about 2 TB of the drippings.
-      Add onion and garlic to pan with bacon and drippings and sauté until slightly tender.
-     Add the diced tomatoes, jalapeno, and chicken broth to the pan and then add the beans back in. Cook over low heat until tender.
-     The longer you cook them, the more the broth will cook down and thicken.

*I was out of regular diced tomatoes when I made these & substituted a can of Rotel Tomatoes instead.

**I hate soggy bacon in recipes. Bacon is meant to be crisp. When I cook bacon, I save the drippings in a jar in my fridge. I didn’t use bacon when I made these, only a couple of tablespoons of the bacon fat I had in the fridge.

***Because we’re so short on space, I rarely have chicken broth on hand. Instead I used water with Better than Bouillon Chicken Base.  


Wednesday, February 11, 2015

Macaroni & Cheese

Macaroni & Cheese has long been not only a staple food in our house as the kids were growing up, but a favorite as well. When I was diagnosed with a wheat allergy nearly 5 years ago, it about killed me to give it up. It took what felt like forever to find a pasta that would hold up to making mac & cheese. I had the sauce perfected long before I found one. We started using Sam Mills Pasta. Not only is delicious, it's one of the more affordable gluten free pastas on the market. It is also non-GMO which is important to me. No, they are not paying me to push their pasta. I simply believe in sharing info when I find a good product that makes life easier. :)  As long as you don't overcook it, this pasta will hold up to being put in casseroles and being reheated as leftovers without turning to mush like brown rice pasta. 

So as I've mentioned before, I'm not always one for measuring when I create a recipe. So think of this recipe as more of a guideline and have fun with it. 

16 oz. bag of Sam Mills Gluten Free Pasta (or any regular pasta if you're not gluten free)
Milk (I use whole milk. I like the richness that it adds.)
6-8 oz. Velveeta
1-2 handfuls of shredded cheese of your choice (this is where the fun comes in. I've used cheddar (sharp, medium, mild), Mexican blend, Italian blend, provolone, parmesan, basically whatever shredded cheese I happen to have on hand.

Cook pasta al dente, drain, run under cold water and set aside.
In same pan pasta was cooked in, add milk (about 1 1/2 cups) and Velveeta. Stir often until Velveeta is melted and mixture is smooth. Add in a large handful or two of shredded cheese and stir until smooth. Season with pepper or seasoning of your choice. Add cooked pasta to sauce, mix well and make sure it is heated through.

If the cheese sauce is too thin, add more shredded cheese. If it's too thick, add more milk until you get the consistency you want. If you like a little spice and aren't making this for little ones, it would be awesome with some pepper jack cheese thrown in. My favorite combination of cheeses for it is sharp cheddar & Italian blend (usually a blend of parmesan, romano, asiago, provolone and mozzarella).

Tuesday, February 10, 2015

Cashew Chicken - version 2.0

Here lately I've felt like I've been in a bit of a cooking rut. This recipe was well liked by the family, but I simply forgot about it. I finally got around to trying an idea I had been toying with for this recipe. I wanted it to taste more authentic, so I subbed sesame oil for the olive oil and chicken broth for the orange juice. It turned out FABULOUS!!! Seriously, it tasted like something that you would get at your favorite Chinese take out place. With those two simple substitutions, it went from being a well liked dinner to being a favorite dinner!  

¾ cup Orange Juice   Chicken Broth
1/3 cup Honey
¼ cup Soy Sauce (make sure it's GF)
1 tsp. Garlic Powder
½ tsp. Pepper
4 boneless Skinless Chicken Breasts
1 1/2 Tbs. Olive Oil  Sesame Oil
1 Tbs. Corn Starch
1 cup Cashews
4 green onion
1 lg, carrot sliced
1 celery stalk, sliced
Combine and set aside the OJ  Chicken Broth, Honey, Soy Sauce, Corn Starch, Garlic Powder, Pepper. In a large pan sauté the chicken. In a separate pan cook olive oil  sesame oil, green onions, carrot, and celery until softened. Add veggies, sauce, cashews to chicken and heat through.

After sauteing the chicken, I remove it from the pan and cut into bite size pieces. I then add the carrot, celery, and green onion to the same pan as the chicken. I basically turn it into a one pot meal. I guess I'm just lazy like that. ;)

Wednesday, September 12, 2012

Crockpot Chocolate Mud Cake (gluten free)

Someone posted this recipe in the crockpot lovers group over on Ravelry, and let me tell you, it is the best! It will cure a chocolate craving real quick. The recipe wasn't originally gluten free, but thanks to the flour blend hubby makes up for me, not a problem!

Ingredients:
1 cup gluten free flour blend
2 TB baking powder
6 TB butter
2 oz. semisweet chocolate or chocolate chips
1 cup sugar, divided
3 TB cocoa powder plus 1/3 cup cocoa powder
1 TB vanilla extract
1/4 tsp salt
1/3 cup milk
1 egg yolk
1/3 cup brown sugar
1 1/2 cups hot water

Directions:
1. Coat inside of a 2 1/2 quart to 5 quart crockpot with cooking spray. (The cake's appearance and cooking time with vary with the size of your crockpot)
2. Whisk together the flour and baking powder in a medium size bowl and set aside.
3. In a large bowl, melt the butter and chocolate in the microwave or over a pan of simmering water and mix well.
4. Whisk in 2/3 cup of sugar, 3 TB of cocoa, vanilla, salt, milk, and egg yolk.
5. Add flour mixture and stir until thoroughly mixed.
6. Pour batter into the crockpot and spread evenly.
7. In a medium bowl, whisk together remaining sugar (1/3 cup white and 1/3 cup brown), cocoa (1/3 cup), and hot water until the sugar is dissolved.
8. Pour mixture over the batter in the crockpot.
9. Cover and cook on high for 1 1/4 - 2 1/4 hours, depending on the size of the crockpot.
10. Even when done, the cake will be very moist and floating on a layer of molten chocolate, but you will know when it is ready when nearly all of the cake is set and the edges begin to pull away from the sides of the crockpot.
11. As you check the cake's progress, try not to let the condensed steam from the lid drip on the cake. When it is done, turn off the power and remove the lid.
12. Let cool for 25 minutes, then serve with whipped cream or ice cream.

Monday, September 10, 2012

Gluten Free Bread

Hubby and I have been playing around with different bread recipes over the past couple of years but haven't come across any that we truly love except those that come from mixes. As fabulous as we think the gf flour blend we've come up with is, it just doesn't sub straight across well in bread recipes. Finally one day I suggested that we measure out how much "flour" is in our favorite bread mix and use our flour blend and their "recipe". It turned out pretty decent. Definitely cheaper than paying $6+ for a loaf of gf bread. After the bread cools completely, I recommend slicing it and placing the slices in a sandwich bag (1-2 slices) and then placing the sandwich bags in a gallon bag and then freezing them. That way you only have to defrost what you need and none is wasted.

Jenn's Gluten Free Bread

2 3/4 cups gluten free flour blend
1 packet of yeast or 2 1/4 tsp granulated yeast
1 TB xantham gum
1 tsp salt
1 TB sugar
2 large eggs
1/4 cup oil
1 TB vinegar
1 2/3 cups warm water

Mix water, yeast, and sugar together and let yeast proof. Add eggs, oil, and vinegar and mix. Add flour blend, xantham gum, and salt. Mix on high for 4 minutes.

For Bread: Place dough in a large greased loaf pan, cover and let rise until doubled. Bake at 350 degrees for 35-45 minutes.

For Rolls: Transfer dough to a cake pan using an ice cream scoop. Each scoop is a roll. Cover and let rise until double. Bake at 350 degrees for 20-25 minutes.

Gluten Free Flour Blend (updated recipe)

Since the last time I posted the gluten free flour blend we use, my hubby has played around with it some more and come up with a blend we absolutely love. It's not too far off from the old recipe though. This is also for a double batch. We store it in gallon ice cream containers at the back of the fridge and just pull it out when we need it. We've had great success using it in non-gluten free cookie recipes. For the brown rice flour, we use a grain mill that has never been used with wheat and we grind it ourselves. We use Lundberg Farms Organic Brown Rice that comes in 20 lb. bags at Costco.

Gluten Free Flour Blend

11 cups brown rice flour
1 1/2 cups sorghum flour
6 cups corn starch
2 cups potato starch
3 cups tapioca flour
1 cup potato flour
1 1/2 cups sweet rice flour
4 TB xantham gum

Blend all ingredients really well and store in airtight containers in the fridge.

Tuesday, June 5, 2012

Coconut Lime Sugar Cookies & Cheesecake

I came across this recipe on Pinterest recently and just had to give it a go at making it gluten free. I love sugar cookies. This recipe did not disappoint. The end result is the perfect combination of crunch and chewiness. Everything a sugar cookie should be. Then I had the brilliant idea to pair these cookies with no-bake cheesecake filling. The end result?  Sheer bliss! With the first batch of cookies, I sandwiched the cheesecake filling between two cookies. Pretty simple and definitely tasty. Then I got the brilliant idea to make mini-cheesecakes by baking the cookie inside a paper cupcake wrapper, allowing them to cool and then piping filling on them and topping with a bit of cherry pie filling. Either way this recipe was a definite success. We have a new favorite dessert!

Coconut Lime Sugar Cookies

2 3/4 cups gluten free flour blend
1 tsp. xantham gum
1 tsp. baking soda
1/2 tsp. baking powder
1/2 tsp. salt
1 cup butter, softened
1 1/2 cups white sugar
1 egg
1/2 tsp. vanilla extract
zest of one lime, finely minced
3 TB. lime juice
1/2 cup unsweetened toasted coconut
1/2 cup sugar for rolling cookies

Preheat oven to 350 degrees. Line cookie sheets with parchment paper. In small bowl stir together gf flour blend, xantham gum, baking soda, baking powder, and salt. Set aside.  Beat butter and sugar until smooth and fluffy.  Beat in egg, vanilla extract, lime juice and lime zest. Gradually blend in dry ingredients and coconut. Roll rounded teaspoonfuls of dough into balls and roll in sugar. Place on lined cookie sheets about 1 1/2" apart. They do spread out quite a bit. Bake 8-10 minutes or until lightly browned. Let stand on cookie sheet for two minutes before moving to cooling racks.

Note:  I did not bother to toast the coconut nor did I have any lime zest but the cookies turned out great anyways. What can I say, I'm lazy like that sometimes when it comes to baking. :)

No-Bake Cheesecake Filling (from the Keebler website)

This has been my go-to no-bake cheesecake filling for more than 20 years now. I absolutely love how rich and creamy it is.

8 oz. cream cheese, softened
8 oz. sour cream
8 oz. container of Cool-Whip
1/3 cup sugar
1 tsp. vanilla extract

Whip cream cheese and sour cream together until smooth. Add sugar and vanilla. Beat in Cool Whip. Spread over a gluten free crust, sandwich between cookies, the possibilities are endless. Refrigerate for at least 4 hours before serving.

Photobucket

Photobucket

Photobucket

Photobucket

Thursday, May 10, 2012

Garlic Pepper Sausage, Green Beans, and Potatoes

Not exactly a catchy name I know, but it does well at describing the dish. ;)  I love this meal for multiple reasons. It's a one dish meal so cleanup is easy. It tastes delicious. My family loves it. It's quick to make. Serve it with a side salad and some fresh fruit and there you go. Dinner in under an hour.

1 lb. smoked sausage (make sure it's gluten free if that's a concern)
4-6 red or gold potatoes, cut into 1" pieces
1 lb. fresh or frozen green beans
McCormick Garlic Pepper Seasoning

Slice sausage into 1/4" rounds. In large skillet with lid, brown sausage. Add potatoes, stir, and cover skillet. Check often to make sure the potatoes aren't sticking to the pan/burning. Add a bit of water if need be to help them steam and keep them from sticking. When potatoes are done, add green beans, sprinkle liberally with seasoning, stir and cover. Cook until green beans are tender. Be careful not to overcook. Enjoy!

P.S. Be sure and use red or gold potatoes. Russets will turn to mush and do not work well for this recipe.

Photobucket

Sunflower Cake - Gluten Free

I realize I haven't been around for a while. It's been rather busy lately. Even though Easter is long past, I wanted to share this cake that I made. I got the idea from Pinterest, my latest obsession. :)  I used the coconut cake recipe posted here. Rather than using homemade frosting I was in a hurry and used Betty Crocker milk chocolate frosting. Peeps were placed around the edge of the cake and mini chocolate chips sprinkled in the middle. It was super fun and easy to do. I can't wait to do another one next year!

Photobucket

Tuesday, January 31, 2012

Sloppy Joes

When DH and I got married, his mom introduced me to a recipe for sloppy joes that used Campbell's chicken gumbo soup, ketchup, and mustard. I thought that was THE oddest combination ever. Then I tried it. Oh my gosh...BEST sloppy joes ever!  Now that I have to eat gluten free I just had to find a way to make them again but without the chicken gumbo soup because these sloppy joes stuffed into a baked potato and topped with sour cream & cheese is one of hubby's most favorite meals ever.

 Photobucket

1 - 1 1/2 lbs extra lean ground beef
1 medium onion, finely diced
black pepper
Mrs. Dash
2-3 tsp. Better Than Bouillon (beef) Paste
1 cup ketchup
1/2 TB yellow mustard
2 cups water

Brown ground beef in deep skillet with onion. Season liberally with black pepper & Mrs. Dash.  When beef is done cooking, add water, bouillon paste, ketchup, and mustard. Stir well to make sure ingredients are thoroughly blended. Make sure the taste is just right. Trust me, you'll know if it is or isn't. It shouldn't taste too much like ketchup or too much like mustard. If it seems to be lacking a bit of flavor, add more Mrs. Dash. Reduce heat and simmer until the sauce thickens up. Serve on buns or over baked potatoes.

Monday, January 23, 2012

Olive Garden's Pasta Fagioli Soup

I clipped this recipe from the newspaper nearly 7 years ago. It is my absolute favorite soup to make when it's cold and snowy out (next to chicken & dumplings). :)  Normally I make it in a pan and let it simmer. Today when I made it, I used my crockpot because I had a crazy busy day. If you're using a crockpot, simply add the ground beef and all the other ingredients to the crockpot rather than simmering in a dutch oven. (Don't forget to wait to add the noodles till shortly before serving). Easy peasy and incredibly delicious!

2 cups small shaped pasta (I use Schar gluten free fusili)
1 lb. extra lean ground beef
1 cup chopped onion
1 TB minced or chopped garlic
1 cup sliced celery
1 cup diced carrots (regular or baby carrots)
2 cans Italian diced tomatoes (14.5 oz)
1 - 15 oz can white beans, drained and rinsed
1 - 15 oz can red kidney beans, drained and rinsed
1 - 15 oz can tomato sauce
2 - 5.5 oz cans V-8 Juice (I've never seen cans this small, I simply used a 12 oz. can)
3 cups beef, chicken, or vegetable broth (I use Pacific Foods beef broth)
1 TB white or rice vinegar
1/2 tsp. dried thyme
1/2 tsp. black pepper
1 tsp. basil
1 tsp. oregano
1/2 cup shredded parmesan cheese (optional)

Cook noodles according to package directions, drain & set aside.  In large dutch oven, brown ground beef until nearly cooked through. Add onion, garlic, celery, and carrots and cook together for 5 minutes. Add all remaining ingredients, except pasta, lower heat, and simmer for about 45 minutes. Stir in cooked noodles and simmer for about 15 more minutes. If desired sprinkle parmesan cheese over each bowl of soup when serving.

Wednesday, January 18, 2012

Chicken Enchiladas

I'll warn you now, this is a VERY Americanized recipe but oh so delicious! It's easy peasy to put together and quite honestly served over some steamed rice it's a great comfort food. You can find the soup mixes I use at http://www.momsplaceglutenfree.com. No, I don't work for them or have any stake in recommending them, but I have used many of their products and find them to be delicious and a way to enjoy some of my favorite comfort foods. Okay, now on to the recipe. :)

1 package Mom's Place Gluten Free Cream of Mushroom Soup Mix
1 package Mom's Place Gluten Free Cream of Chicken Soup Mix
1/2 container Philadelphia Cooking Cream Original Flavor approx.
1/2-3/4 cup sour cream
1 small can diced green chiles
1-2 cups diced, cooked chicken (I use either leftover chicken or a can of white meat chicken chunks) couple of handfuls of shredded Colby Jack or 3 cheese blend
____________________________________
Corn Tortillas
More shredded cheese

In a medium saucepan over med-high heat whisk together soup mixes and 2 1/2 cups cold water. Cook until thickened. Remove from heat. Add the remaining ingredients and mix well. Put a thin layer of sauce in the bottom of a casserole dish. Layer with corn tortillas, more sauce, tortillas, sauce, until you run out of sauce. Sprinkle some cheese on top and bake at 350 degrees until the casserole is all bubbly and the cheese is lightly browned.

Wednesday, November 9, 2011

Sweet Potato Souffle

1 large can sweet potatoes (or yams) drained & mashed
1 C. sugar
2 eggs
1 tsp. vanilla
1/2 C. milk
3/4 stick of butter (don't use margarine)

Mix all together and put into a greased 9X13 dish.

Topping:
1 C. brown sugar
1/3 C. (a little less) rice flour
1/3 C. butter (don't use margarine)
1 C. chopped pecans

Melt butter and pour over sugar flour & pecans. Cook at 350 for about 30 minutes or until the center isn't jiggly.


Monday, September 12, 2011

Egg Rolls

I learned how to make these from a friend's mom and they have been a favorite ever since. They are not Asian in any sense of the word other than the egg roll wrappers used. It's a completely Americanized dish and we love them. Hubby & the kids beg me to make them. To make them gluten free, use rice paper wrappers instead of egg roll wrappers. Rice paper wrappers/sheets can be bought at just about any Asian food store. They are shelf stable and need to be rehydrated to use them. I was thrilled when I found them and we all shouted for joy that we didn't have to give up our egg rolls. :)

1 lb. ground beef
3-4 potatoes, scrubbed & diced
1 medium onion, finely diced or put through a food processor
2 cans french cut green beans, drained
salt & pepper

Brown ground beef with onion & salt & pepper. When ground beef is cooked through, add the potatoes and cook until potatoes are tender. Add green beans and remove from heat. Let mixture cool enough to be able to handle it and so that the heat won't melt the egg roll wrappers. Put a small amount of filling in the center of a wrapper, roll and seal. Repeat until filling & wrappers are gone. Fry egg rolls until golden brown and drain on paper towels. These are delicious with sweet & sour or duck sauce. You can also experiment with the fillings.

We had these for dinner last night and we filled them with the above listed ingredients and a bag of tricolor coleslaw mix. I love coleslaw mix for stuff like this because it's already cut up. All I have to do it cook it. :)

Friday, August 19, 2011

Kisha's Meatballs

Otherwise known as the most delicious meatballs ever! I got this recipe from one of my online friends, Kisha when she shared it in a Close To My Heart consultant forum. I've made lots of meatballs over the years, but none come close to these when you're looking for a plate piled high with spaghetti & meatballs or a hearty meatball sub. Mmmmm. These are the best! Oh, and to make them even better....I simply put them in sauce in my crockpot. Dinner doesn't get much easier than that!

To make this recipe gluten free, see my notes at the end of the recipe.

2 lbs. ground beef
2 eggs
2 cups Italian seasoned bread crumbs*
1 small palmful oregano
1 small palmful parsley
1 small palmful basil
1 cup grated Parmesan cheese
1 tsp. salt
1 tsp. pepper

Mix together and roll into 2" balls. (a Pampered Chef cookie scoop works great for this). Plop into sauce & let simmer at least 4 hours until cooked through. The longer they cook, the softer they are, the more delish they are!

*To make gluten free, substitute gluten free bread crumbs. You can buy them most anywhere that sells gluten free products or you can make your own.

To make my own, I simply save all the heels from the loaves of gluten free bread that I buy (or make). I store them in a ziplock bag (in the fridge) until I have enough to make a decent batch of breadcrumbs. I run the bread through my food processor until crumbly and then store in the freezer in a container or ziplock bag until I need them.


Thursday, August 11, 2011

Chocolate Whoopie Pies

This recipe was published in the July 10th issue of Parade Magazine. I knew when I saw it that I just had to try making it, but gluten free. So I can't tell you how it tastes made with the white flour it calls for, but my gluten free version tastes wonderful! They are incredibly sinful and remind me of ding dongs, only without the chocolate coating. :)

Thanks to a friend I realized that I left brown sugar off of the list of ingredients for the pies. Thanks Donna for catching that mistake!

Pies:

1 2/3 cups all-purpose flour (I used a gluten free flour blend. See below.)
2/3 cup unsweetened cocoa powder
1 1/2 teaspoons baking soda
1/2 teaspoon salt
4 Tablespoons butter, at room temperature
4 Tablespoons vegetable shortening
1 cup packed brown sugar
1 large egg
1 teaspoon vanilla extract
1 1/4 cups milk

Marshmallow Filling:
1 1/2 cups marshmallow fluff (I use one whole jar)
3/4 cup vegetable shortening
3/4 - 1 cup confectioners sugar
1 Tablespoon vanilla extract

1.)Preheat oven to 375 degrees. Line two baking sheets with parchment paper.
2.) Sift together flour, cocoa powder, baking soda, and salt. Set aside.
3.) Beat butter, shortening, and brown sugar on low until just combined. Increase speed to medium and beat for 3 minutes. Add egg & vanilla and beat for 2 more minutes.
4.) Add half of flour mixture and half of milk to batter. Beat briefly on low. Beat in remaining flour mixture and milk.
5.) Using a spoon or cookie scoop, drop onto parchment lined baking sheets, 2 inches apart. Bake one sheet at a time for 10 minutes. Allow to cool for 5 minutes on the baking sheet before removing to a wire rack to cool completely.
6.) To make filling: Beat fluff and shortening for 3 minutes on medium. Reduce speed to low, and add sugar and vanilla. Beat until incorporated. Increase speed to medium, beat until fluffy.
7.) Sandwich filling between the flat sides of two pies. Repeat.

Gluten Free Flour Blend (large batch)

5 cups brown rice flour
1 1/2 cups sorghum flour
1 1/2 cups tapioca flour
2 2/3 cups cornstarch
1 cup potato starch
1/2 cup potato flour
1 1/2 Tablespoons xantham gum

Mix all ingredients together until well blended. Store in the refrigerator till ready to use.

Monday, May 2, 2011

PB & J Bars

I found this recipe in the April 17, 2010 issue of Family Circle Magazine. My daughter made it once the way the recipe says and really liked it. When cleaning off the side of my fridge of all sorts of papers and such under magnets I came across this recipe and decided to make it gluten free. It's definitely a great recipe made either way. I mean what's not to love about PB & J, no matter what the form?

1 1/4 cups all purpose flour (I used a homemade gluten free flour blend)
1/4 teaspoon baking powder (make sure it's gluten free)
1/8 teaspoon salt
6 Tablespoons unsalted butter, softened
1/2 cup sugar
1 egg
1 cup creamy peanut butter
1/2 teaspoon vanilla extract (make sure it's gluten free)
1 cup seedless strawberry jam (I made mine with raspberry - use whatever your flavor preference is)
2/3 cup salted peanuts, chopped

Heat oven to 350 degrees. Place aluminum foil in the bottom and overhanging the sides of a 9x13x2 inch baking pan; set aside.

In a medium bowl, stir together flour, baking powder, and salt until well blended.

Beat butter and sugar on medium high speed until fluffy, about 2 minutes. Add egg and beat until incorporated. Add peanut butter and beat until blended, about 2 minutes.

On low speed, add in flour and beat just until blended. Stir in vanilla extract. Spread into prepared pan and bake for 30 minutes. Remove from oven and spread with jam and sprinkle with peanuts; bake an additional 5 minutes. Cool completely on wire rack, then lift from pan using aluminum foil; cut into 18 bars.

Tuesday, April 26, 2011

Butternut Squash Soup

I found this recipe in Parade Magazine in the Sunday paper a while back. Not everyone in our family loves butternut squash as much as I do, but even those who won't eat the squash will eat this soup!

I don't bother with the optional garnishes or nutmeg when spicing it and it still turns out great.

1 butternut squash (about 3 pounds)
3 slender or 1 1/2 large leeks, white parts only, split lengthwise, washed, and cut into 1 inch pieces.
3 cups whole milk
3 cups water
salt & pepper
freshly grated nutmeg

Peel the squash. Remove the seed and string, then cut into 1 -2 inch chunks. Put in soup pot or dutch oven with leeks, milk, and water. Salt generously and bring to a boil. Lower heat and simmer for 25-30 minutes, or until squash is soft enough to mash when pressed lightly with the back of a spoon.

Using an immersion blender, blender, or food processor, puree the soup in small batches until it is very smooth. Thin to desired consistency with milk or water. Season with salt & pepper to taste. You may also season with nutmeg.

Optional Garnish: 1 tart apple, peeled and finely diced, about 1/3 cup toasted hazelnuts or walnuts, about 1/2 cup creme fraiche or heavy cream.

Monday, April 25, 2011

Gluten Free Coconut Cake w/Buttercream Frosting

Rather than typing out the recipe today, I am being lazy and only sharing a link. I made this cake for Easter and it was fabulous. It has a wonderful flavor and fabulous texture. It reminds me of a cross between a normal cake and a pound cake with it's density. The only thing I would recommend changing is the frosting. For some reason the frosting recipe calls for 2 1/2 cups of shortening. I'm thinking it must be a typo but haven't found a correction for it yet. While the frosting was the right consistency, it was simply too greasy for me. So please, give the recipe a try and let me know what you do with the frosting and how it turns out for you.

Gluten Free Coconut Cake w/Buttercream Frosting

Photobucket

Not the prettiest picture, I guess I should've made that cut a little more neatly. LOL But it was definitely yummy!

Wednesday, April 13, 2011

Hamburger Rice Skillet

I created this recipe with some leftovers and odds and ends of veggies I had in the fridge one night when I was desperate to get dinner on the table. It has become a dinnertime staple and any leftovers are quickly gone.

1 lb. hamburger
1 medium onion, diced
5-6 large carrots - peeled and sliced
2-3 stalks celery, diced
2 cups white rice
1 quart beef broth ( I use Pacific Foods Organic, which is also gluten free)
2 TB soy sauce (I use La Choy which is gluten free)
2 cups frozen peas
Black Pepper to taste

Brown hamburger with onion and black pepper. When no longer pink, add celery, carrots, soy sauce, rice, and beef broth. Cover and simmer until the liquids have been absorbed and the rice is tender. Add frozen peas and heat through.

The first time I made this dish it was with leftover roast beef and veggies that needed used up. I've also made it with leftover chicken (and chicken broth). You can add as many or as few veggies as you like. They can be fresh, frozen, or leftover. If using leftover or frozen veggies, you will want to add them when the rice is done and only cook long enough to heat them through so they don't become mushy.